Foodbuzz Banner

Find What You're Looking For

Showing posts with label sauce. Show all posts

Monday, April 2, 2012

Chocolate Sauce

Well, I've done it. I've created a monster. I didn't intend to do it. I bought the chocolate milk to mix with my coffee, honestly. On a whim, I gave some to DJ when he was whining that he wanted his apple juice (which we had none of in the house.) 


Yesterday, DJ requested his chocolate milk. I went to the refrigerator and it was bare...of course it would be, I haven't been home to grocery shop. Don't even get me started on the amount of laundry that I have to catch up on - yikes. So I decided to improvise and whip up some chocolate sauce to put in 2% milk we had. I'll let my toughest critic speak for himself...
Trying it out...
and it's good!

Ingredients
1 cup semisweet chocolate chips
3/4 cup whipping cream
1 teaspoon vanilla


Directions
In a small saucepan over low heat, heat chocolate chips and whipping cream, stirring constantly. Continue to cook, stirring constantly, until chocolate is melted and sauce is smooth. Stir in vanilla. 

Source:
About.com

Wednesday, December 28, 2011

Two Ingredient Oven Ribs


"You can't eat anything that scratches backwards on New Years Day, it's a sign of backward progress."


I can still hear my mom saying that. She has a knack for interesting sayings and phrases. Last year, I found this delicious sweet and sour sauce to accompany pork. This year, I bring to you a two ingredient rib recipe that is baked in the oven that will have people going something like, "Wow, these are the most delicious ribs I've ever eaten." I like to hear things like mmmm, best ever, and absolutely delicious when people eat my food. 


Ingredients
Pork ribs
1 bottle, barbecue sauce
1/2 cup orange juice. 


Directions
Preheat oven to 300 degrees Fahrenheit. 


In a 9x13 pan, mix bottle of barbecue sauce and orange juice. Place ribs in pan and using tongs, flip to coat. Cover tightly with aluminum foil and put into oven. 


Depending on the amount of ribs, total cooking time can be as short as two hours or as long as four hours. Half way through cooking, flip ribs using tongs. 


Source:  Cooking for Engineers

Monday, July 11, 2011

Simple Tomato Sauce


DJ absolutely loves the movie Cars. I swear that if we let him, he would watch it over and over again. When I had coupons for sunglasses and let him choose, he went right for the Lightning McQueen without hesitation. If he were a bit older, we would probably be taking him to the movie theatre to see the second movie. He loves how fast Lightning is, how he flashes his lightning bolt, and says "Ka-Chow". I prefer Mater. He's friendly, no fuss, and a bit on the simple side. The small things (tractor tipping) make him happy. I really think that sometimes schedules get so hectic that we forget to take a breather and just slow down a bit. Wow...pretty deep thought about a tow truck from an animated movie, huh?


My point? This tomato sauce is my Mater in the kitchen. It's wonderful, takes a minute to throw together if you count the time to open the cans, and has a wonderful, full bodied flavor. It's hard to believe that there are only three (four, if you add salt) ingredients. Most of the time just involves allowing the sauce to simmer, stirring occassionally, of course. The 45 minutes that it took to simmer were painful. DJ's therapist even commented about how she was going to have pasta for dinner because it smelled so good in our house. This sauce is user friendly, no fuss, and completely simple.


I do have to say that I adapted the recipe slightly because I like a chunky sauce. When I read the recipe, I decided that I would dice the onion instead of halving it and I left it in the sauce, mashing it along with the tomato. I was looking forward to left overs the next day, but there were none to put in the fridge. In this house of pasta eaters, this recipe is my go-to for a quick and easy sauce.


Ingredients
1 (28 oz.) can whole peeled tomatoes, with juices
1 onion, peeled and diced (or halved, depending on preference)
5 tbsp. unsalted butter
Salt, to taste


Directions
Combine the tomatoes, onion, and butter in a medium saucepan over medium heat.  Bring the mixture to a simmer, then reduce the heat to keep the sauce at a low, steady simmer for 45 minutes.  Using a potato masher, mash the tomato and onion into smaller pieces or crush the tomato with a spoon and discard onion halves, based upon your preference. Serve warm with pasta.


Source: adapted from Annie’s Eats,  Essentials of Italian Cooking by Marcella Hazan via Smitten Kitchen

Friday, July 8, 2011

Sweet and Sour Sauce


They say that the road to hell is paved with the best of intentions. I have the best of intentions to get dinner on the table. I have the best of intentions to pull myself from playing outside in the beautiful sunshine to come in and cook over a stove. I had the best of intentions to take a beautiful picture of the chicken that this sauce covered. But as you can see, it didn't survive long enough. Heaven, I tell you. It was absolute heaven. Such a wonderful surprise.

Dan loves sweet and sour chicken. It is the only thing he orders when we get Chinese food. Order in? Sweet and Sour Chicken. Chinese Buffet? Sweet and Sour Chicken. Steak Restaurant? Sweet and Sour...just kidding, the biggest steak that they have. He ate several servings and would have licked the pan clean if he could. The best part of this recipe? It takes five minutes to make and thicken the sauce. The original recipe calls for simmering the sauce in the microwave. I decided to just bust out the skillet and make this sauce on the stovetop. Still took five minutes. That's right - five.

Directions
1 small can pineapple juice (or juice from a 15-1/4 oz. can pineapple chunks, drained) 1/4 cup ketchup
1/4 cup brown sugar
1/4 cup vinegar
1 1/2 tablespoons cornstarch
1/2 teaspoon granulated garlic
1/4 teaspoon mustard powder
1 tablespoon Worcestershire sauce (or less)
1/2 teaspoon ground ginger

Ingredients

Mix all together and cook over medium heat until thickened. Sauce may be prepared on stovetop or in microwave in microwave-safe bowl. Simmer for approximately 4 1/2 minutes on high or until thick, stirring occasionally.

Tuesday, March 22, 2011

Pizza Sauce


Every weekend at some point is pizza night at our house. I think it's always nice to have a night in - usually with pizza night and a movie from Redbox. When I first started, I bought pre-made everything. Those little pizzas were good when we really didn't have a fully functional and equipped kitchen, but soon I was ready to move on and make a little more myself. I started making the pizza dough recipe from Annie's Eats.


This past weekend, I realized that I had no pizza sauce. I turned to my pantry and realized that I had enough crushed/diced/whole tomatoes to be able to finally try homemade sauce - something that I always wanted to do, but never got around to. This sauce is amazing. It matches well with the dough, cheese, and has the perfect consistency that my family likes with a little bit of chunk in the sauce but does not leave you feeling like you just ate a whole tomato. I adapted this recipe based upon the reader reviews and added 1 teaspoon of brown sugar to balance the acidity of the tomatoes. I also used my immersion blender to make a more consistent sauce and break up some of those larger tomato pieces that were floating around. This recipe makes a lot of pizza sauce. I froze them in one pizza increments so that I can thaw them as needed. Whatever will I do with it? Oh, the possibilities. 


Ingredients
1/2 cup chopped onions
2 tablespoons minced garlic
2 tablespoons oil
1 cup crushed tomatoes
8 ounces tomato sauce
6 ounces tomato paste
1 teaspoon brown sugar

1 teaspoon salt
2 teaspoons oregano
2 teaspoons basil
1/8 teaspoon pepper


Directions
In a large skillet, heat oil over medium heat. Add onion and garlic and saute until tender, about five minutes. Be careful not to burn the garlic or you will have to start all over!  

Add remaining ingredients and stir to combine. Using an immersion blender, break up the larger pieces of tomato. Let simmer for 30 minutes, stirring occasionally.

Source: adapted from MizzNezz, Food.com

Wednesday, March 9, 2011

Strawberry Cake and Dessert Sauce


Even though I love to bake, you'd never realize it from my posts. I have posted far more meals than anything else in the time that I have been blogging.  I do save room for dessert, really. The only trouble is that it tends to go so very fast that I never get a good picture before it is pulverized. 

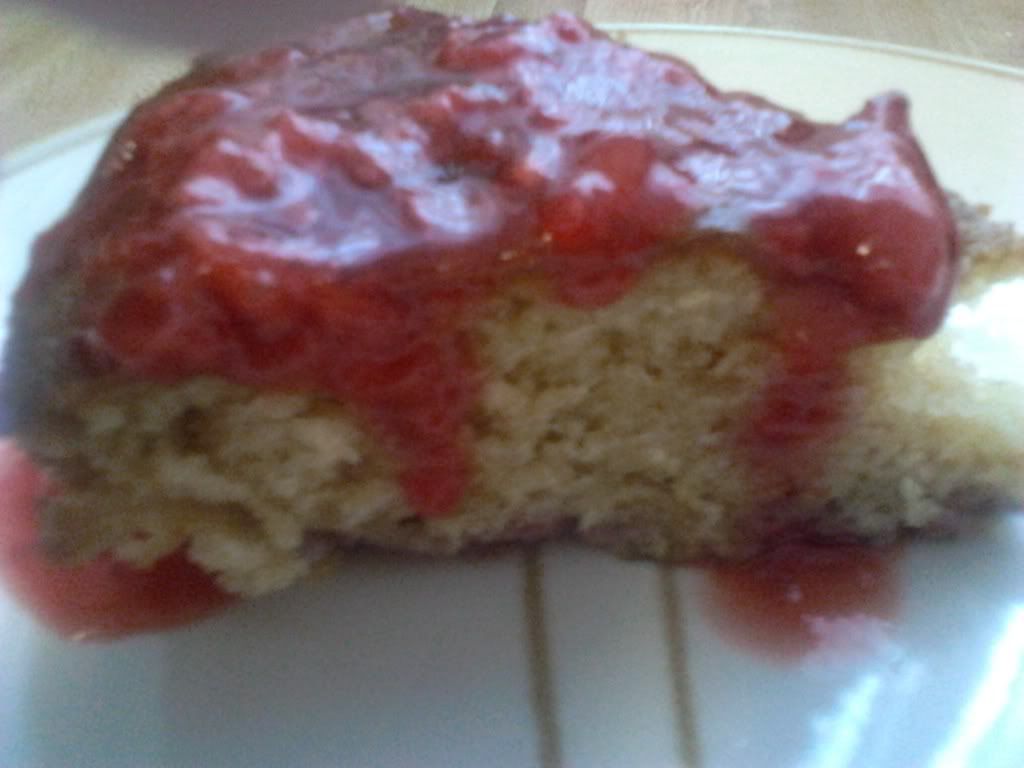
This is my final installment of low sodium meal. I have given you an appetizer, entree and side, and now it is time (hope you saved room) for dessert. This cake proves that you can still follow a low sodium diet and have all of the normal yummy things, just with a few changes. In this case, I used low sodium baking powder and baking soda, both found at Whole Foods. There are quartered pieces of strawberry in the cake that are hidden in the bottom. 


Now on the the sauce...oh, the sauce. As I sit here typing, I am drooling over my keyboard. The strawberry sauce is a definite keeper and would add a wonderful flavor to pound cake, waffles, or even just by itself on a spoon! I may have done that, just sayin'. I hope that you have enjoyed this meal and thought about adding these low sodium options into your rotation. 

I was invited by Lisa of Sweet As Sugar Cookies to participate in her Sweets for a Saturday. Wish me luck! 


Low Sodium Strawberry Cake
Ingredients

2 c. all-purpose flour
1 c. sugar
1 tablespoon  sodium-free baking powder
1 teaspoon sodium-free baking soda
1 c. low fat milk
2 eggs
1/2 c. (1 stick) unsalted butter, melted
2 T. freshly squeezed lemon juice
1 t. pure lemon extract
1 pint fresh strawberries, washed, hulled and sliced

Directions
Preheat oven to 375 degrees. Grease and flour the bottom and sides of a 10-inch pan; set aside. If you are lucky enough to have a springform pan, then it would be wonderful to use for this recipe.
Measure the flour, sugar, baking powder and baking soda into a large mixing bowl and whisk well to combine. Stir in the milk, eggs, butter, lemon juice and extract. Batter will be light and airy. Pour batter into the prepared pan, then arrange strawberry slices on top of the batter as desired. Place pan on middle rack in oven and bake 40-45 minutes, until tester inserted into center of the cake comes clean. Remove cake from oven and place on wire rack. 

Strawberry Dessert Sauce

Ingredients

1 pint fresh strawberries or 2 cups frozen unsweetened strawberries, thawed
3 tablespoons sugar
1 tablespoon cornstarch
1/4 cup water
1 tablespoon lemon juice

Directions
Mash strawberries; set aside. In a small saucepan, combine the sugar, water, and mashed strawberry. In a separate bowl, combine the cornstarch and lemon juice. Bring to a boil; cook and stir for 2 minutes or until thickened. Transfer to a small bowl. Refrigerate until chilled. 
Source: Taste of Home

Wednesday, February 9, 2011

Chicken Ragu


When I saw the title of this recipe while flipping through a Giada De Laurentiis cookbook, I had to giggle a little bit. I reverted back to the fact that up until a few years ago, ragu meant the jarred sauce. One of the things that I love about Giada's Family Dinners is the fact that under every title is a brief explanation of the dish. Allow me to impress you with my knowledge of a ragu. 

A ragu is a meat-based sauce that is placed over pasta. The meat is added to a mixture of onion, celery, and carrot (called a soffritto) in addition to tomatoes and other seasonings. Oh, how far I have come from my original thoughts of what a ragu is.

As I read through the recipe, I knew that it would be something that we could all enjoy. I really don't like Italian food very much, but the recipe even called for a quick marinara sauce which I knew would be perfect for me to dip from. A visit to the pantry and I knew that I would be making this meal before the week was up as I had everything that I needed on hand. I love how quickly the marinara sauce came together, living up to its name. It tasted absolutely delicious with my bread sticks.

Ingredients

  • 2 tablespoons olive oil
  • 6 boneless skinless chicken thighs, finely chopped
  • Salt and freshly ground pepper
  • 1/2 cup finely chopped shallots
  • 1 tablespoon minced garlic
  • 2/3 cup dry white wine
  • 2 teaspoons finely chopped fresh rosemary leaves
  • 4 cups Marinara Sauce, recipe follows
  • 1 pound linguine
  • 1/2 cup freshly grated Parmesan

Directions

Heat the oil in a heavy large skillet over medium-high heat. Add the chicken, season with salt and pepper, and cook until the juices evaporate and the chicken is golden, about 10 minutes. Add the shallots and garlic and saute until tender, about 2 minutes. Add the wine and stir to scrape up any brown bits on the bottom of the skillet. Add the rosemary and mix well. Add the marinara sauce and bring to a simmer. Reduce the heat to medium-low and simmer gently until the flavors blend, about 10 minutes.


Meanwhile, bring a large pot of salted water to a boil. Add the linguine and cook until al dente, stirring occasionally, about 8 minutes. Drain, reserving 1 cup of cooking liquid. Add the linguine to the ragu and toss to coat, adding some reserved cooking liquid to moisten. Transfer the pasta to a large serving bowl. Sprinkle with Parmesan and serve.

Marinara Sauce:

  • 1/2 cup extra-virgin olive oil
  • 2 small onions, finely chopped
  • 2 garlic cloves, finely chopped
  • 2 stalks celery, finely chopped
  • 2 carrots, peeled and finely chopped
  • 1/2 teaspoon sea salt, plus more to taste
  • 1/2 teaspoon freshly ground black pepper, plus more to taste
  • 2 (32-ounce) cans crushed tomatoes
  • 2 dried bay leaves
In a large casserole pot, heat the oil over a medium-high flame. Add the onions and garlic and saute until the onions are translucent, about 10 minutes. Add the celery, carrots, and 1/2 teaspoon each of salt and pepper. Saute until all the vegetables are soft, about 10 minutes. Add the tomatoes and bay leaves, and simmer uncovered over low heat until the sauce thickens, about 1 hour. Remove and discard the bay leaf. Season the sauce with more salt and pepper, to taste. (The sauce can be made 1 day ahead. Cool, then cover and refrigerate. Rewarm over medium heat before using.)

Source: Giada DeLaurentiis, Family Dinners, Food Network

Monday, January 3, 2011

Sweet and Sour Sauce

Good morning! Now that we are back to school, my posts will be coming earlier in the morning. I hope that everyone had a wonderful New Year. Now, on to the food.

I love fast food and take out. It's really too bad that my budget won't allow for such things anymore. So when I can find a recipe that takes like, or even better, than the take out I've learned to love, it's a bonus to be able to make it at home. While searching for a recipe for the massive amounts of pork that I cooked on  New Years, I found this little gem. Recreating sweet and sour sauce has been one tough battle in my household. It's either too sweet or too sour, but never the perfect blend...until now. This source also has a recipe for frying the pork, but I took the heathlier route and used a pork loin that I had simmering in the crock pot all day. This sauce was absolutely perfect. Just the perfect blend of sweet and sour, and just enough to cover the meat so that it is not overpowering. Try it and I promise, you won't be disappointed. The best part of this recipe is the adaptability. It would taste wonderful with chicken, beef, and shrimp.


Ingredients:
1 1/2 tablespoons tomato ketchup
1 teaspoon plum sauce
1/8 teaspoon Chinese rice vinegar (transparent in color)
1/2 teaspoon Lea & Perrins Worcestershire Sauce
1 teaspoon oyster sauce
1 teaspoon corn starch
1 teaspoon sugar
2 tablespoons water

Directions:
1.) Mix the sweet and sour sauce ingredients well and set aside.
2.) Heat up a wok and add in some cooking oil.
3.) Add in the chopped garlic and stir fry until light brown, then follow by the bell peppers and pineapple pieces.
4.) Stir fry until you smell the peppery aroma from the peppers and then add in the sweet and sour sauce.
5.) As soon as the sauce thickenens, transfer the pork into the wok and stir well with the sauce.
Source: Rasa Malaysia
 
Blog Design by Delicious Design Studio